Pressure Pillows

Showing posts with label Pilates. Show all posts

Wednesday, August 11, 2010

How to Make a Pilates 'du Jour' Sign


D
aily hand-written signs are friendly and lively. They let people know what's going on inside your business. Restaurants use handwritten signs to feature what they have on the menu for that day - why not a Pilates studio?

Most people like to find a studio fairly close to their home or work. If a potential client has been eye-ing your studio on the way home, why not give them an invitation to come to class? Create a eye catching Today's Classes sign. Perhaps after seeing the "Wednesday Mat Class at 12:00" displayed on your sign, 3 or 4 times -the 5th time they may just stop in.

I made this one out of a children's' Ikea dry-erase board and added some wheat grass to give it a little character. It paid for itself within the first 3 hours it was out on the corner.


This Ikea dry erase board was $20 and the wheat grass $2.00-$3.00 a piece. Find them at any health food grocery or pet store. You could also use river stones. I think a little detail like this makes it interesting to foot traffic.

I chose wheat grass because I think it give the feeling of vitality!

I even put a few business cards in the grass.


Sunday, July 18, 2010

Bodytonic Pilates, Seattle Wa

I just started teaching Pilates on Sundays at Bodytonic Pilates in Seattle's historic Pioneer Square. The studio is nestled in an old building surrounded by exposed brick, black fire escapes, _and climbing ivy.
With my love for spacial design, I like how the bright cheerful interior juxtaposes the dark historic building. The colors and design elements reflect the ethnic, urban textures of the street.

Climbing the stairs up to the studio takes you back in time to the
Klondike Gold Rush of 1897.

A peaceful place to work out high above the bustling street.


View of downtown

Bodytonic Pilates is located on
89 Yesler Way 3rd floor Seattle, Washington 98104
Visit Bodytonic

Thursday, June 3, 2010

How to Reduce Shoulder Tension with the Foam Roller & the Pressure Pillow


How many times do you have to remind your clients to keep their shoulders down during the early stages of Pilates training?

In most bodies, the shoulders, the trapezius, are a common muscle group that fires and tightens when the body's coordination is called upon in a new and challenging way:

When the core is not yet strong enough for a task, the trapezius muscles fire, and commonly compensate for the strain on the weaker inner unit and less powerful muscles.

The following is a series of simple exercises to help a beginning client release shoulder tension, and create a beautiful back extension helping to facilitate scapula-glide and stabilization that they will not soon forget!

In this example we use the Foam Roller and the Pressure Pillow:

Part One: Upper Trapezius & Rhomboid Release:

The Pressure Pillow is designed to relax the trapezius muscles and will help facilitate scapula glide.

1) Place the Pressure Pillow behind the shoulders. Using the straps, lower it down to the upper trapezius.


2) Lay back on the mat; the two hard inner balls will cradle the spine and press in to the muscles between the shoulder blades and the spine. Use a small pillow to bring the head in-line with the torso.


3) Breathe and imagine directing the inhale towards the pressure behind the shoulders. Once the inner balls have settled into the back comfortably, circle the arms several times like a ballet port-de bra. Change direction and move the pillow to a new place, repeating the above steps.

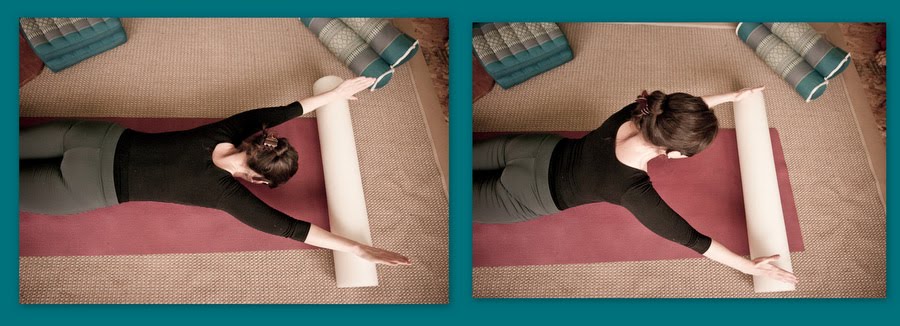
Part 2: Swan on Foam Roller with Scapula Mobilization. (Thumbs-up, Thumbs-down)


1) Inhale: Shrug the shoulders, pointing the thumbs down, rolling the arms towards the ears in the sockets.

2) Exhale: Draw the shoulder blades down the back of the rib cage rolling the thumbs up, and the arms away from the ears. Lift the head neck and chest into extension. Making sure the cervical spine is in true extension of the thoracic spine (not a 'kicked-back' neck).

3) Inhale: Return down shrug the shoulders up.

Cues: Cue your client by: promoting the lift through the core, broadening the shoulders away from each other as the arms turn and the scapula glide down the back. Cue them to take deep, full breaths expanding the back of the rib cage. Here are some of my favorite cues for this exercise:
  • "Inhale, and imagine the back of your rib cage filling with air like a balloon."
  • "Exhale, let the shoulders slide down into your back pockets"
  • "Imagine your bones are your arms, and your muscles are your clothes; the bones move easily and freely inside the muscles."
  • "Imagine your wings are broadening as your arms unwind and your shoulders glide down the back of the ribcage."

Photos by Jorge Lausell

Your client will enjoy the simple understanding of easy scapula movement and stabilization with a relaxed shoulder girdle.

Enjoy!